Back to Home

Clipizo Ballpoint

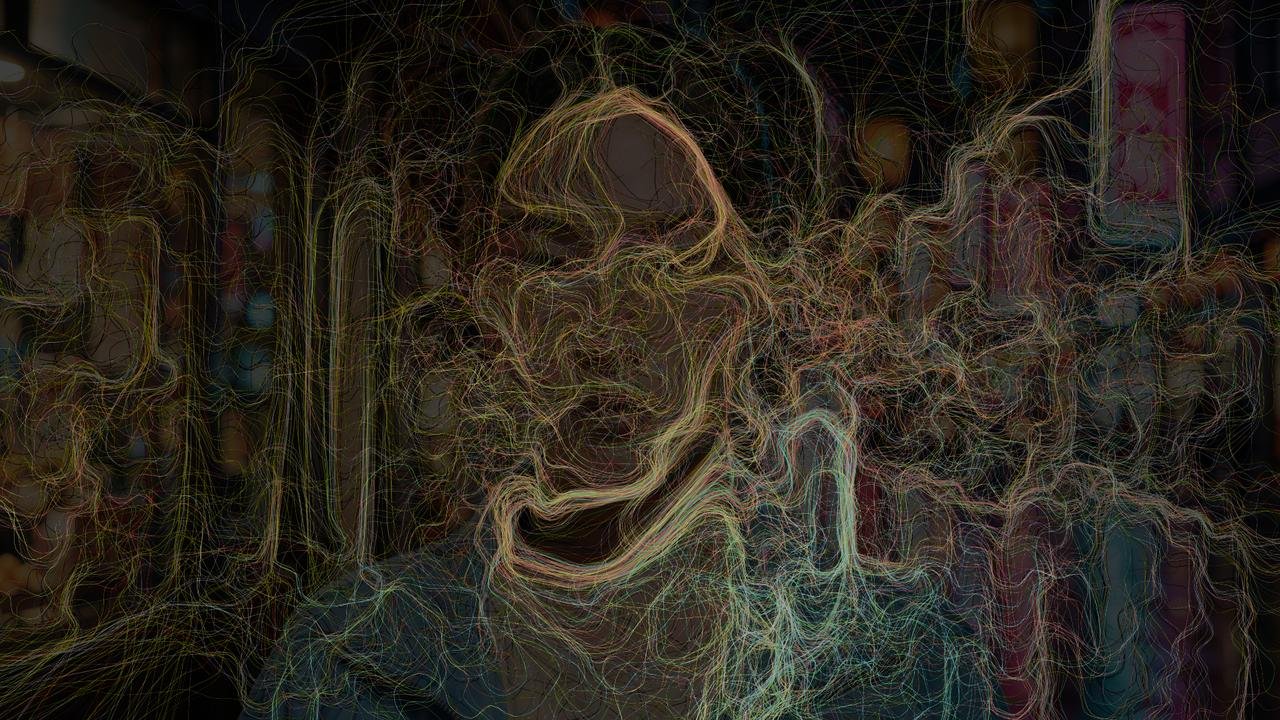
Strands of pixels grow out of the bright or dark parts of the frame and follow its shapes, so your footage becomes ink. Free to download.

Free33 downloads Download

Reviews

No reviews yet. Used Clipizo Ballpoint? Be the first to share how it went.

Write a review

After you download Clipizo Ballpoint, your download email has a Leave a review link. Reviews written there appear here labelled Verified download.

Write a review as a Clipizo member

Uses a free Clipizo account. Your review is labelled Clipizo member and appears after approval.

Verified reviews come from Clipizo downloads · Member reviews are moderated · No review is hidden for its rating.

Overview

Connect footage, a title or a logo to Clipizo Ballpoint. Strands grow from the Bright Areas or the Dark Areas and follow the shapes in the picture. Threads sets how many there are, Reach how long they get and Thread Weight how thick they are.

Each strand is made of the picture's own pixels, sorted along it by Luminance, Hue, Red, Green or Blue. Keep the footage's colors or use one Ink Color, over the original video, a solid color or transparency. Animate Reveal to draw the strands on.

Requirements

Software
DaVinci Resolve 21.1 or newer, Free or Studio, on the Fusion page, or Fusion Studio
Operating system
Windows 10 or 11, 64-bit; macOS 15 or later on Apple silicon (Resolve 21.1's minimum)
License
None: no key, no activation and no account
Download
One ZIP for Windows or macOS with the Studio installer, Silkizo.fuse (the Clipizo Ballpoint Fuse) and the Edit page effect

Questions about your setup? Ask in the Clipizo Discord or send us a message.

Key features

  • Grow strands from Bright Areas or Dark Areas, with Seed Level, Threads, Reach, Spread, Thread Weight and Dissolve.
  • Shape them with Strength, Follow Shape, Weft Angle, Warp Angle, Curl, Curve and Hand Jitter.
  • Sort the pixels along each strand by Luminance, Hue, Red, Green or Blue, with the bright or the dark pixels toward the tip.
  • Color: the footage's own colors or one Ink Color, over the original video, a solid color or transparency, with Background Opacity and Background Blur.
  • Reveal: draw the strands on, with Stagger and eight orders such as Brightest First, Center Out, Edges In and Left to Right.
  • Also an effect on the Edit page: Effects > Clipizo > Clipizo Ballpoint.
  • Free download, no key.

Best for

  • Music videos
  • Logo and title reveals
  • Stylized portraits
  • Intros and outros
  • Animated backgrounds
  • Transitions
Setup & help guide for Clipizo Ballpoint Install, find it in Resolve, the controls, common problems, uninstall

Clipizo Ballpoint v1.0, the ink strands Fuse.

Install
  1. Extract the complete ZIP before installing, and read legal/CLIPIZO_PRODUCT_LICENSE.txt.
  2. Resolve Studio / Fusion Studio: drag Clipizo Ballpoint studio installer.lua into the Nodes area of the Fusion page. The result appears in the Console. Then restart. The installer also adds the Edit page effect.
  3. Resolve Free (works in Studio too): close Resolve and copy Silkizo.fuse (the Clipizo Ballpoint Fuse) into your user Fuses folder, creating it if needed. Resolve Free doesn't run the Studio installer.
  4. Windows user Fuses folder: %APPDATA%\Blackmagic Design\DaVinci Resolve\Support\Fusion\Fuses
  5. macOS user Fuses folder: ~/Library/Application Support/Blackmagic Design/DaVinci Resolve/Fusion/Fuses/
  6. Edit page effect by hand: copy Clipizo Ballpoint.setting and Clipizo Ballpoint.png into Templates/Edit/Effects/Clipizo inside the same Fusion folder, creating the folders if needed.
  7. Keep one copy of Clipizo Ballpoint in your Fuses folders, and restart Resolve after installing or updating.
Where it appears in Resolve

On the Fusion page, press Shift+Space and type Clipizo Ballpoint. In the Effects Library it is under Clipizo.

Connect footage, a title or a logo to its input, and its output to MediaOut1 or a Merge.

On the Edit page it is under Effects > Clipizo > Clipizo Ballpoint. Drag it onto a clip.

Controls in plain words

Some controls appear only after choosing the relevant mode.

Strokes
Grow From
Bright Areas or Dark Areas: where the strands start.
Seed Level
How bright or dark an area has to be before strands grow from it.
Threads
How many strands.
Reach
How many steps each strand grows.
Spread
How far each growth step goes. With Reach it sets how far a strand travels. Higher means longer, looser strands.
Thread Weight
How thick the strands are.
Dissolve
How much of each strand fades out toward its tip. 0 is solid to the tip, and 1 fades over about the last 70%.
Physics
Strength
How strongly a strand turns to follow the outlines in the picture as it grows. 0 lets it run straight.
Scan Span
How wide an area is read for outlines. Higher values follow larger shapes and ignore fine detail.
Follow Shape
How much a strand's starting direction follows the outline rather than pointing away from the middle of the picture. 0 makes the strands burst outward, and 1 starts them along the outlines.
Weft Angle / Warp Angle
About 70% of the strands start along the outlines and about 30% across them. Weft Angle turns the first group and Warp Angle the second, from -90 to 90 degrees.
Curl / Curve / Curve Variation
Bend the strands. Curl bends them more toward the tip, and Curve Variation bends each one differently.
Hand Jitter
Adds a hand-drawn wobble.
Reveal
Reveal
Draws the strands on. Animate it from 0 to 1.
Stagger
Spreads the strands' starts over the reveal.
Reveal Order
Random, Brightest First, Center Out, Edges In, Left to Right, Right to Left, Bottom to Top or Top to Bottom.
Pixel flow
Sort By
Sorts the pixels along each strand by Luminance, Hue, Red, Green or Blue.
Flow Toward Tip
Bright Pixels or Dark Pixels: which end of the sort sits at the tip.
Seed
A different arrangement of strands.
Image
Fade
Fades the strands.
Background
Original (your video), Color or Transparent.
Background Opacity / Background Blur
Dim or blur the picture behind the strands.
Color
Line Color
Original Color uses the footage's own colors. Ink Color uses one color.
Tint / Tint Amount
Tint is the ink color. With Line Color set to Ink Color every strand takes it, and Tint Amount has no effect. With Original Color, Tint Amount mixes the tint into the footage colors. It starts at 0.25 with an olive tint, so set it to 0 for pure footage colors.
Bg
The color for Background set to Color.
Common problems
Not in the tool search
Extract the ZIP, check that the file still ends in .fuse, and restart Resolve after copying it. Use the user Fuses location for a manual install. Avoid installing a second copy of the same tool.
An older interface still appears
Resolve caches Fuse code. Fully restart it, then try a newly added node; an existing node may retain saved values.
Rendering is slow
Very high Threads or Reach values take long. Lower them while editing.
The Edit page effect is missing
The Studio installer adds it. After a manual install, copy Clipizo Ballpoint.setting and Clipizo Ballpoint.png into Templates/Edit/Effects/Clipizo inside the same Fusion folder, then restart.
A Mac blocks the downloaded file
Use System Settings > Privacy & Security > Open Anyway.
Uninstall
  1. Close Resolve / Fusion. Move only Silkizo.fuse out of the Fuses folder where you installed it, to a backup folder outside the Fusion search folders.
  2. If you used the Studio installer, check the destination it reported (which can be the shared Clipizo/Fuses folder). Leave other Clipizo files in place.
  3. Restart the application. Existing projects using this tool will need it reinstalled to render the same result.
  4. Edit page effect: delete Clipizo Ballpoint.setting and Clipizo Ballpoint.png from Templates/Edit/Effects/Clipizo in the same Fusion folder.

Still stuck? Contact Clipizo with the plugin version, Resolve version, operating system and the exact error message.

Get Clipizo Ballpoint

Check the requirements first.

Free33 downloads Download